Drawing Simple Shapes
https://www.tes.com/lessons/d2Yesrz6cGlS5A/art-4-representational-drawing
|

https://www.arttutor.com/blog/201801/how-start-drawing-using-simple-shapes
|
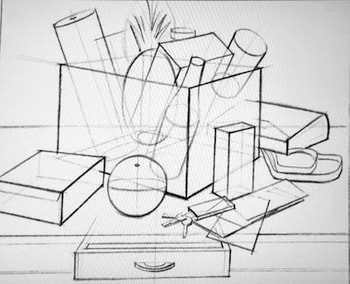
Square/cubes, circles/globes, cylinders, ellipses, and triangle/pyramid are the common forms that can be found in complex objects. Learning to correctly draw these shapes will improve your drawing skills. Many artists begin their drawings by looking for theses shapes inside of complex objects, and begin by drawing these shapes first. They then morph these shapes to create the more complex forms.
We will be drawing freehand. There are some great benefits to learning to draw freehand. Drawing without rulers or templates helps you build hand eye coordination and improves focus. Freehand drawing is also beneficial when drawing on location or when a ruler or template is not available for use.
Line and Circle Exercises
Lines - Many people struggle to draw straight lines and uniform circles without using rulers, compasses, etc. Below are some tips that improve drawing accuracy. The most important way to improve drawing skills is to practice.
Straight Lines – Read the tips and practice them completing a full page of lines that move horizontally, vertically and diagonally.
- Swing your arm from the elbow rather than using just your wrist and hand.
- Draw quickly. Drawing slowly increases mistakes.
- Avoid short, sketch lines using long, smooth strokes.
- If the line tends to drift up or down as you draw, turn the paper to adjust for the natural direction of your stroke.
- If needed, place a dot at the starting and ending point of the line. Focus on the end point as you draw the line.

Circles - Read the tips and practice them completing a full page of circles. Draw many different sizes. Circles may be placed inside of each other. A circle becomes a globe once shading has been added.
- Draw lightly.
- Place the side of your hand down on the paper, and begin circling with your pencil above the paper in the air.
- Circle several times before lowing your pencil and continuing the same circular movement on the paper creating multiple light circles.
- Erase the lines that are inaccurate leaving the best circle. Touch up the shape if necessary.
- An alternative method is to make one lap around the circle stopping once you reach the starting point. The practice circles will only be made in the air before the pencil touches the paper.
- To draw a large circle, rest the outside, bony part of your wrist (right below the large padded section of the palm)
- on the paper. Hold the pencil firmly without allowing it to move. Turn the paper with the pencil touching the surface until it has made a complete circle.
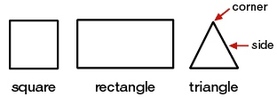
Drawing Squares, Rectangles, and Triangles
Most students understand the basic concepts of drawing these shapes. Practice will improve theses skills. Below are a few tips that will help improve drawing accuracy.
Most students understand the basic concepts of drawing these shapes. Practice will improve theses skills. Below are a few tips that will help improve drawing accuracy.
- Start by place dots to represent the corners where the sides of the shape will meet. The square and rectangle will have four corners and the triangle will have three.
- Using the same concept taught for drawing a straight line, connect the dots keeping the line as straight as possible. Remember to focus on the ending point as you draw.
- Keep lines across from each other on the square/rectangle parallel or an equal distance apart.
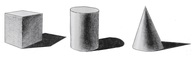
Drawing Forms (Cubes, Cylinder, and Cones)
1. Cube
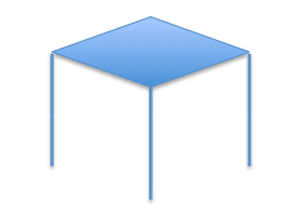
A cube is a three-dimensional square. The viewer will be able to see two or three sides depending on where the cube is positioned. Moving the cube up and down or side to side in front of your line of sight changes the number and amount of the sides you will be able to see. This concept can be used to draw both square and rectangular objects. A rectangle drawn in perspective is called a rectangular solid. Listed below are ways to draw a cube that has one side facing you (1 Point Perspective), and a cube that has been turned so that one corner is closer than the others (2 Point Perspective). For the purpose of this lesson, we will only cover some basic ideas about drawing a cube. Details about drawing in perspective will be covered in a later lesson. Read the tips and practice them completing a full page of cubes and rectangular solid shapes.
1. Cube
A cube is a three-dimensional square. The viewer will be able to see two or three sides depending on where the cube is positioned. Moving the cube up and down or side to side in front of your line of sight changes the number and amount of the sides you will be able to see. This concept can be used to draw both square and rectangular objects. A rectangle drawn in perspective is called a rectangular solid. Listed below are ways to draw a cube that has one side facing you (1 Point Perspective), and a cube that has been turned so that one corner is closer than the others (2 Point Perspective). For the purpose of this lesson, we will only cover some basic ideas about drawing a cube. Details about drawing in perspective will be covered in a later lesson. Read the tips and practice them completing a full page of cubes and rectangular solid shapes.
Side Facing the Viewer (1 Point Perspective)
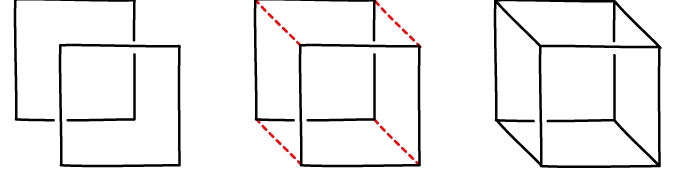
Method 1
Method 1
- Draw a square.
- Draw a second overlapping square that is slightly higher and to the side of the first square.
- Connect the four corners of the square.
- Erase all the interior lines so that the cube has a front, top and side.
Method 2
- Begin by drawing a square.
- Draw 3 diagonal lines that move in the same direction toward an imaginary point in space.
- Lines should gradually be getting closer together as they move back and away from the square.
- Once the intended length of the box side and top has been reached, draw the back edge and side edge of the box.
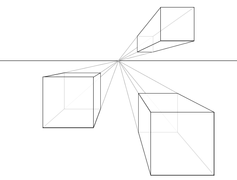
Corner Facing Viewer - (2 Point Perspective)
Begin by imagining a wooden block lying on the table in front of you. It’s turned so that one of the top corners (vertices) is pointing toward you. It looks like a baseball diamond with home plate closest to you. If you look at just what you see, the distance between home plate and second base appears shorter than the distance from first base to third base, when in reality, they’re the same length. This is called foreshortening.
To draw the cube, start with home plate.
- Place a dot on the paper where home plate would be in your mind’s eye.
- Directly above home plate, a short distance away, place another dot for second base. (The line that could be drawn between these two dots is called a diagonal in geometry.)
- Then we’ll place dots for 1st base and 3rd base to the sides. Note, the diagonals should bisect (cut in half) each other at 90°, though you don’t have to draw them.
- Connect the four dots HP-1st-2nd-3rd-HP. You should now have a diamond shape (a rhombus) that is shorter than it is wide. See first figure.

5. Now, from 3rd, 1st and HP, draw 3 separate vertical lines. This centerline should be slightly longer than the sides
and all the lines should be as parallel as possible. See second figure.
and all the lines should be as parallel as possible. See second figure.
6. Draw a line from the bottom of each vertical line to enclose the bottom of the cube.
Checking for Accuracy
Visually, things appear to get smaller as they move away from the viewer. For example, the tree right outside your window looks much bigger than the tree at the end of the street. In reality, the tree at the end of the street may be much taller, but it appears smaller because it is farther away. This principle applies when drawing a cube, The parts of the cube that are closest to you appear slightly bigger than those that are farther from you. Because the cube is relatively small, the size difference is not very easy to detect.
· All diagonal lines get closer together as they move away from the viewer.
· The vertical line on the front of the box is slightly longer than the vertical lines on the two sides of the box.
· Vertical or horizontal lines are parallel to each other.
2. Cylinder
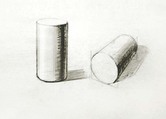
A cylinder is a geometric shape that has parallel sides and a circular cross section. Examples of a cylinder include cans, tubes, and pipes..
The Ellipse
To create the rounded ends of a cylinder, you need to learn how to draw an ellipse. An ellipse is a circle seen in perspective or a circle viewed at an angle. Take a drinking glass or open can. Look directly down at the top of the glass and notice that the opening is perfectly round. Begin turning it vertically away from your body and toward the back wall. That perfect circle begins to look like an oval not a circle. The shape of the opening has not changed, just its position in space. Drawing an ellipse captures that change. The viewers point of view directly affects how narrow or wide the ellipse appears. The closer the rim of the glass is to eye level, the narrower the ellipse. If the glass rim is held directly in front of your eyes, it becomes a straight line.
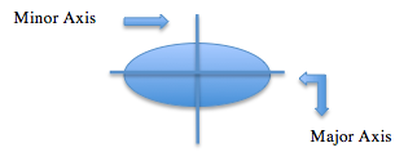
An ellipse is symmetrical both horizontally and vertically when divided in half. The vertical division is called the Minor Axis and the horizontal division is called the Major Axis. Read the tips and practice them completing a full page of ellipses. Draw a variety of ellipses that range from almost completely round to almost a straight line.
A cylinder is a geometric shape that has parallel sides and a circular cross section. Examples of a cylinder include cans, tubes, and pipes..
The Ellipse
To create the rounded ends of a cylinder, you need to learn how to draw an ellipse. An ellipse is a circle seen in perspective or a circle viewed at an angle. Take a drinking glass or open can. Look directly down at the top of the glass and notice that the opening is perfectly round. Begin turning it vertically away from your body and toward the back wall. That perfect circle begins to look like an oval not a circle. The shape of the opening has not changed, just its position in space. Drawing an ellipse captures that change. The viewers point of view directly affects how narrow or wide the ellipse appears. The closer the rim of the glass is to eye level, the narrower the ellipse. If the glass rim is held directly in front of your eyes, it becomes a straight line.
An ellipse is symmetrical both horizontally and vertically when divided in half. The vertical division is called the Minor Axis and the horizontal division is called the Major Axis. Read the tips and practice them completing a full page of ellipses. Draw a variety of ellipses that range from almost completely round to almost a straight line.
- Rehearse the shape in the air several times then place the pencil on the paper repeating the movement (see the circle drawing technique).
- The Minor Axis of the ellipse tends to line up with your arm. Turn the paper so that the axis is positioned correctly on the paper.
- To check accuracy, draw the Minor Axis in the center of the ellipse. Fold your paper along the minor axis. Hold your paper to the light and see how close the halves match.
- Draw a long straight line to represent the Minor Axis. Practice putting different sizes of ellipses on the line.
- Draw an opened ended cone shape. Place a line down the center. This line will become the Minor Axis. Draw a series of ellipses that are centered on the Minor Axis and touch the outer cone lines. Using limitations increases drawing accuracy since there will be constraints in real objects.
- Things to Avoid
- No football shapes. Keep corners rounded, because there are no points on a circle.
- No hotdog shapes. The sides of the ellipse gently sloop up toward the Minor Axis. The top and bottom of the ellipse are not flat
The Cylinder
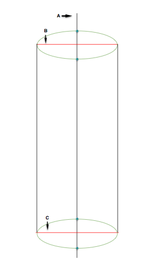
Read the tips and practice them completing a full page of cylinders. Draw lightly. After using the method below, try drawing a few cylinders without using any guidelines. You can start by drawing the ellipses and connecting them with vertical lines or start with the sides and fit the ellipse into the top and bottom opening. Try drawing cylinders lying on their sides, as well as, standing up. Check them by adding a middle axis line.
- Draw a vertical line (Line A) that will be longer than the cylinder. This will become a center guideline for the cylinder and the Minor Axis for the ellipses.
- Place a shorter horizontal line (Line B) near the top of Line A and another horizontal line (Line C) near the bottom of Line A. These lines should be centered on Line A and be the same length.
- Connect the left end of Line B with the left end of Line C to make a line that is parallel to Line A. Repeat this step on the right side.
- The drawing now appears to be a rectangle with a line running through the center.
- Place a dot at the top of Line A (which is slightly above Line B). Go below Line B and place another dot on Line A the same distance from Line B as the first dot.
- Repeat this step at the bottom above and below Line C.
- Each pair of dots will mark the bottom and top of your ellipses. The sides of each ellipse will touch the corners of the rectangle.
- Starting at the top, draw your ellipse using dots and corners as a guideline. Line A and Line B will intersect in the center of your ellipse creating the Major and Minor Axis.
- Check the ellipse for symmetry using the Major and Minor Axis.
- Repeat this process on the bottom of the rectangle.
- Erase Lines A, B, and C. Also erase the back half of the bottom ellipse (from the rectangles corners up to the interior dot).
- Draw a line down from the top outer edge of the top ellipse to the outer edge of the bottom ellipse on both sides to complete the cylinder.
- Check for accuracy
· Avoid flat bottoms. Students usually round the top of a cylinder, but often make the bottom a straight line. This
occurs because the bottom of the cylinder is generally sitting on a surface making the curved line less obvious
· Check for pointed edges. Remember the ellipse has rounded not pointed corners.
· The cylinder should be symmetrical when a line is drawn down the center.
· The top and bottom ellipses on a cylinder are not the exact same size, because they are viewed at different
eye levels. The longer the cylinder, the more pronounced the size difference becomes.
The Cone
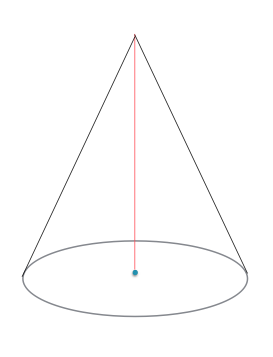
A cone is a form that has a circular base with sides that taper up to a point or apex. The circular end of the cone is an ellipse. A perfect circle would only be drawn when the cone is viewed straight on from the bottom or apex. Read the tips and practice them completing a full page of cones. Try drawing some cones lying on their sides. Remember to keep the apex centered over the center of the ellipse. Draw with and without using guidelines.
Check for Accuracy
A cone is a form that has a circular base with sides that taper up to a point or apex. The circular end of the cone is an ellipse. A perfect circle would only be drawn when the cone is viewed straight on from the bottom or apex. Read the tips and practice them completing a full page of cones. Try drawing some cones lying on their sides. Remember to keep the apex centered over the center of the ellipse. Draw with and without using guidelines.
- Draw an ellipse
- Place a dot in the center of the ellipse.
- Draw a second dot above the ellipse over the center dot.
- Starting on the left side, draw a diagonal line from the left edge of the ellipse to the dot above it.
- Repeat this step on the right side.
- Erase the back half of the ellipse leaving a curved line from the edge of the ellipse toward the viewer.
Check for Accuracy
- Check the ellipse for pointed corners and a flat bottom.
- The angled lines that move up to the apex should be the same length.
- The cone should be symmetrical when a line is drawn down the center.
- The Apex is always centered over the middle of the ellipse where the Major and Minor axis cross.