Repousee Illustration
300-Year-Old Botanical Illustrations and the Art They Inspire Today
By Emma Taggart on October 15, 2018
https://mymodernmet.com/history-of-botanical-illustration/
Prior to the invention of photography, botanical illustration was the only way of visually recording the world’s many species of plant life. Today, science books are full of highly detailed photographs—often taken with a macro lens or even a microscope—allowing us to discover the fascinating forms of flora and fauna. However, before these advances in technology, it was artists and illustrators who were depended on to share the beauty of botany with the world. The job requires great artistic skill, attention to fine detail, and technical horticultural knowledge.
In the past, illustrations of plant life were used by physicians, pharmacists, botanical scientists, and gardeners for identification, analysis, and classification. While these works are not as relevant to researchers today, they have become an inspiration for artists who are paying homage to plant life in contemporary ways.
What is botanical illustration?
Botanical illustration is the art of depicting the form, color, and details of plant life. The practice can be traced back to sometime between 50 and 70 CE, when an illustrated book titled De Materia Medica was created by Greek botanist Pedanius Dioscorides to help readers identify plant species for medicinal purposes. The eighteenth century saw many advances in the printing processes, allowing colors and details of drawings to appear even more accurate on paper. As interest in botanical publications increased, the role of botanical illustrator came to be considered a respected profession.
Famous Botanical Artists
MARIA SIBYLLA MERIAN (1647 – 1717)
PIERRE-JOSEPH REDOUTÉ (1766 – 1854)
THE BAUER BROTHERSANNE PRATT (1806 – 1893)
MARIANNE NORTH (1830 – 1890)
ERNST HAECKEL (1834-1919)
|
Instructions Botantical Illustration
|
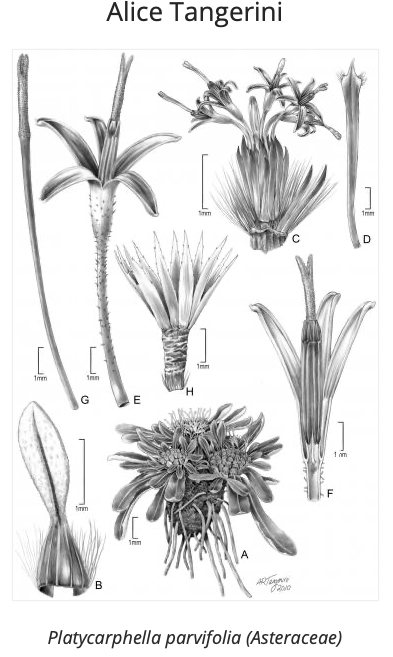
https://www.asba-art.org/member-gallery/alice-tangerini
|
Repousse Process
Review the history of Repousse found on the Copper Repousse page (https://lundgrenart.weebly.com/copper-repoussezentangle.html). You will also find videos and links to websites on this page
Copper Foil Directions
Review the history of Repousse found on the Copper Repousse page (https://lundgrenart.weebly.com/copper-repoussezentangle.html). You will also find videos and links to websites on this page
Copper Foil Directions
- Draw your final design onto a sheet of regular white paper the same size as your foil.
- Put your drawing on top of your foil and tape it down.
- Place it all on a foam sheet (you need a soft surface) and then lightly outline your entire drawing with a dull pencil or wooden tool. How hard you press depends on the thickness of your paper and foil. The foil will tear if you push too hard.
- Once you have your image transferred, you can start embossing. Make sure you work on a foam sheet. There are wooden tools and popsicle sticks that can be used to shape the metal.
- Press over the lines to make them pop out more. Try flipping over your design and doing some chasing on the other side.
- To age it and create more dimension, paint the foil using India ink (waterproof black ink). After applying the ink, wipe away some of the wet ink with a paper towel. The ink will stay in the recesses and make the overall design pop out more. Experiment until you get the amount you like. BE CAREFUL - THE INK WILL NOT COME OUT OF YOUR CLOTHES.
- Later, a metallic sharpie can be used to highlight a few areas if needed.
