When you have completed your art piece, take a photo of your finished art and turn it in to Canvas .
|
|
Generating Ideas
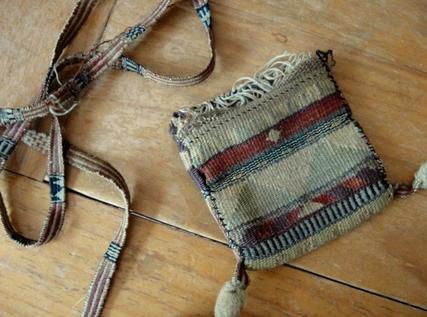
COLOR CHOICES
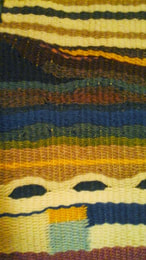
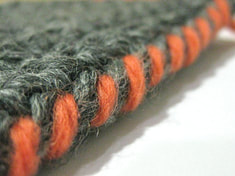
Common Native American - red, black, yellow, green, white, and blue.
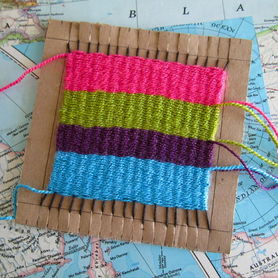
Each color has a symbolic meaning that vary among different tribes. You do not have to use traditional colors. Think about using similar tones or limiting your colors in some way. For example, the picture above use muted tones. The red is washed out not extremely bright.
WEAVING ANALYSIS
Collect 5 weavings online & save on a pages document. Circle your favorite weaving and answer the following questions about it. Save it as a PDF and turn it into Schoology
1. What is your Immediate reaction? List any words that come to mind.
2. Describe what you see in detail listing everything visible in the work. (Imagine you are describing it to someone on the phone).
3. Analysis the weaving. Try to figure out what the artist has done to achieve certain effects. You should refer to your first impressions and try to explain how the artwork achieves that reaction.
5. Judgement - Based on the information you have gathered above, do you believe this artwork was successful? Why or why not? Have your opinions changed since your first impression? If so, how? If you had the money, is this a piece you would buy? Why or why not? What have you learned about this artwork that you can apply to your own weaving?
Researching
VIDEO DEMONSTRATIONS
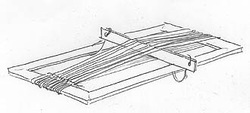
Weaving on a Cardboard Loom (Watch this one first. It is an overview of how to weave)
COLOR CHOICES
Common Native American - red, black, yellow, green, white, and blue.
Each color has a symbolic meaning that vary among different tribes. You do not have to use traditional colors. Think about using similar tones or limiting your colors in some way. For example, the picture above use muted tones. The red is washed out not extremely bright.
WEAVING ANALYSIS
Collect 5 weavings online & save on a pages document. Circle your favorite weaving and answer the following questions about it. Save it as a PDF and turn it into Schoology
1. What is your Immediate reaction? List any words that come to mind.
2. Describe what you see in detail listing everything visible in the work. (Imagine you are describing it to someone on the phone).
3. Analysis the weaving. Try to figure out what the artist has done to achieve certain effects. You should refer to your first impressions and try to explain how the artwork achieves that reaction.
- What do you notice about the artist's choice of materials?
- What grabs your attention in the work?
- What mood or feeling do you get when you look at this work of art?
- Is this a quality piece of artwork (attention to detail, durable, functions as intended, neatness, well - constructed, etc.)? What evidence do you to suggest the level of quality found in the weaving?
5. Judgement - Based on the information you have gathered above, do you believe this artwork was successful? Why or why not? Have your opinions changed since your first impression? If so, how? If you had the money, is this a piece you would buy? Why or why not? What have you learned about this artwork that you can apply to your own weaving?
Researching
VIDEO DEMONSTRATIONS
Weaving on a Cardboard Loom (Watch this one first. It is an overview of how to weave)
Individual Weaving Patterns Video Set (This is a series of 8 videos that show you many different patterns)
Websites showing how to weave a strap for your pouch.
Strap Video/Friendship Bracelet
Wavy Strap/Friendship Bracelet
Other Strap/Friendship Bracelet
Important Terms
WARP WEFT SHED
Strap Video/Friendship Bracelet
Wavy Strap/Friendship Bracelet
Other Strap/Friendship Bracelet
Important Terms
WARP WEFT SHED
|
|
|
- The threads stretched lengthwise on - Threads that are woven through the. -A space created between the stationary warp
the loom. Wrapping the warp threads warp threads across the loom. threads and those lifted by a shed stick; the
around the loomis called "warping the weft is passed through this space.
loom."
SHOT HILL BEAT
the loom. Wrapping the warp threads warp threads across the loom. threads and those lifted by a shed stick; the
around the loomis called "warping the weft is passed through this space.
loom."
SHOT HILL BEAT
|
|
|
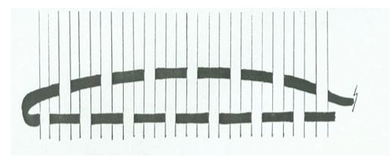
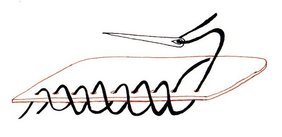
- A woven row -a slight curve is added to the weft - To push the weft close to the previously
before beating it in, in order to prevent woven weft
the selvage. from becoming distorted
SELVEDGE
before beating it in, in order to prevent woven weft
the selvage. from becoming distorted
SELVEDGE
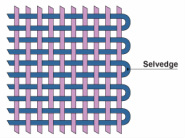
-the woven sides of the piece.
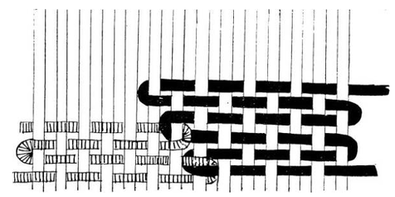
Weaving Patterns
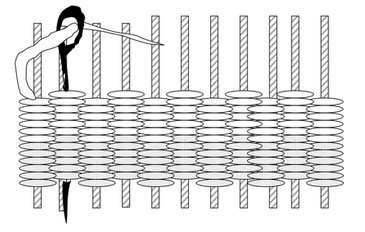
TABBY WEAVE (BASIC)
Weaving Patterns
TABBY WEAVE (BASIC)
|
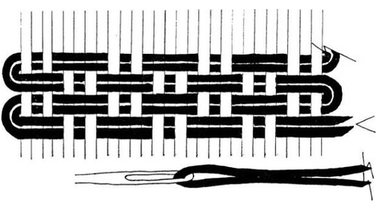
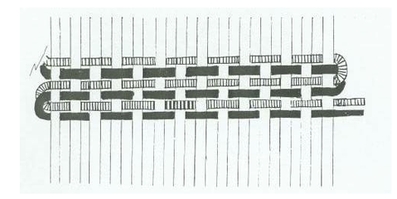
- This is your basic weave. Over 1, under 1. (Does not matter if you start over or under.)
- The bubble in this diagram demonstrates how to keep the selvages straight. |
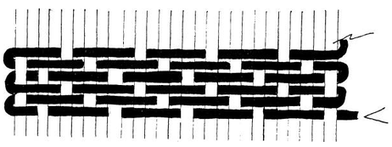
BASKET WEAVE
|
-over 2, under 2. (Does not matter if you start over or under.) Use a double strand of weft.
|
VERTICAL BARS
|
-tabby weave with two colors. Use two needles.
|
DOVETAIL
|
-to change color within the shot. Use two needles.
|
MANIPULATED WEFT
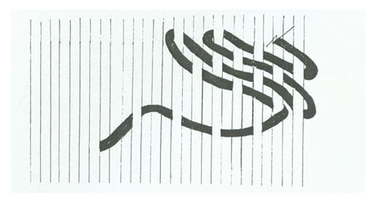
|
-to create curves and organic shapes. Tabby one shot, then push into place. Add more shots to fill in.
|
TWILL
|
-under 1, over 2. This is how jeans and khakis are woven! You'll see the diagonal rows emerge. Create a new shed for each shot from the same side you started.
|
TWINING
|
-creates two-color diagonal stripes or zigzags. Start with a row of tabby, then twine the second color around it, alternating the over/under. Use a 6" (15.25 cm) needle for color A, and a 3" (7.6 cm) needle for color B. Reverse the direction of the pattern by changing the direction from which you twine color B. In the diagram, the needle is shown coming from above color A. On the next shot, bring the needle up from below color A to reverse the pattern.
|
GHIORDES (YOR-deez)
|
-traditional knotting technique for pile carpets. Use 4" (10 cm) strands of yarn. Add a row of tabby after every two rows of knots. Cut the pile to desired height.
|
SOUMAK
|
-another traditional carpet technique. Creates single color diagonals or zigzags. The right side of the diagram shows which way the wefts will slant after beating in.
|
SECURING THE BEGINNING AND END OF YOUR YARN
|
FINISHING YOUR TAPESTRY. Thread a tapestry needle with your weft end. Following a warp thread, take the needle and put it between your weft layers for about 2”. , then trim.
|
TEST PATTERN
Create a test weave using scrap paper. Do not use any full sheet of construction paper. You may use the paper cutter to speed up this process. Every box labeled on the paper cutter's surface is a 1/2".
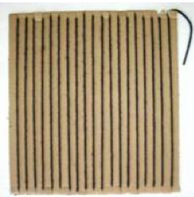
Step 1 - Make a paper loom
- Take the long strip of paper provided and fold it in half.
- Begin cuts on the folded edge
- Cut from the fold toward the opposite, open end stopping 1/2" from the edge of the paper.
- Space cuts about a 1/2" apart
- Don't cut all the way to the edge of the paper or you will have paper strips and not a single paper loom.
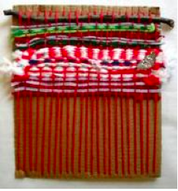
Step 2 - Weft Thread:
- Cut thin strips of scrap paper that are 1/2" or smaller.
- Choose several different colors.
- They don't need to be much longer than the width of the paper loom.
Step 3 - Paper Weaving:
- Choose your first color.
- Start on the right side and weave paper through the paper warp threads starting over the first thread and under the next
- Continue the same pattern over and under until you have reached the other side.
- Choose a second color.
- Start on the right side and weave this strip beginning under the first warp thread (The opposite of your first weft thread)
- Continue the same pattern over and under until you have reached the other side.
- Repeat the alternating rows of over and under until you reach the end of the paper loom choosing a variety of colors as you work.
Step 4 Securing Weft:
- Trim off any extra pieces that stick out past the paper loom
- Take a glue stick and glue the loose ends to the paper loom on both the front and back of the paper loom.
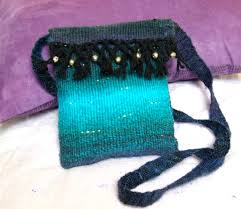
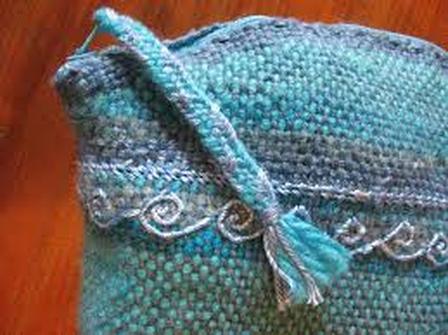
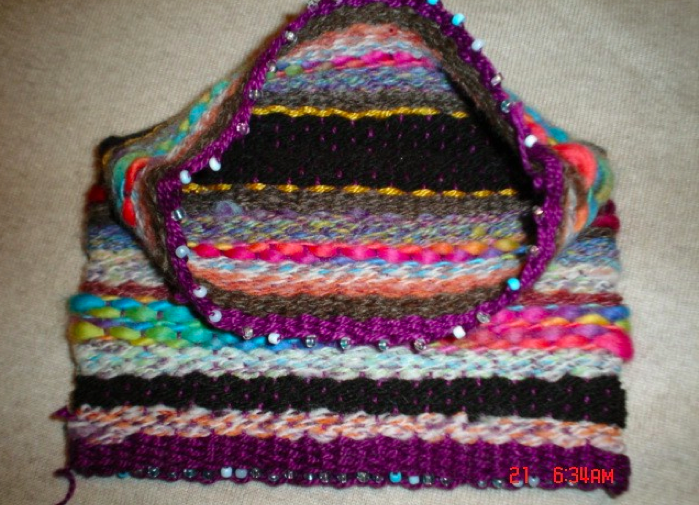
Visual Development
You are going to create a woven pouch based on Native American weaving.
STEP BY STEP
You are going to create a woven pouch based on Native American weaving.
- Include a minimum of 3 colors and one pattern
- Sketch design on paper 1st (can be placed under warp thread to help keep you on track with your pattern)
- Plan colors (based on classroom availability)
- Consider that the woven strip will be folded over to create the pouch when you plan your design
- Use geometric shapes, like triangles or lines. It is more difficult to weave a circle or curved line.
STEP BY STEP
|
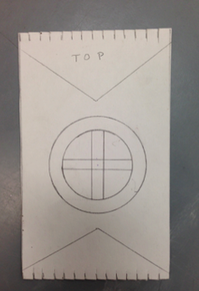
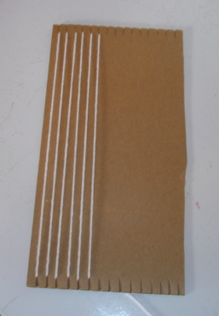
Place your drawn design on top of your cardboard. (This example shows the design right on the cardboard). Do not draw on the cardboard. The looms are reused each year. Your may also slide the paper under the weft yarn before you begin weaving.
|
|
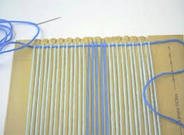
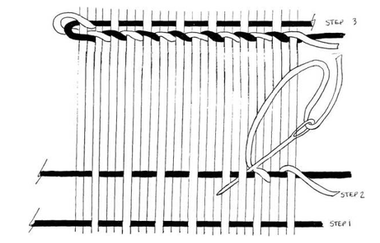
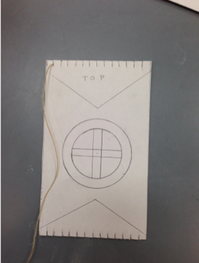
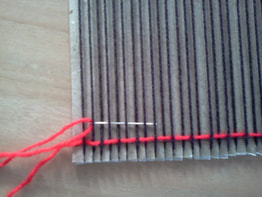
Bring the yarn through the top left slit,with a 3" tail hanging down the back of the board. Use an thin, ugly yarn for your warp. If you pull the yarn, it should not break easily. If it does, choose another yarn. This yarn will not be seen when you are finished weaving.
|
|
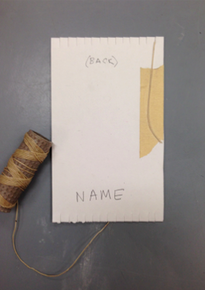
Tape down the tail and write your name ON THE TAPE. (Remember we reuse the looms)
|
|
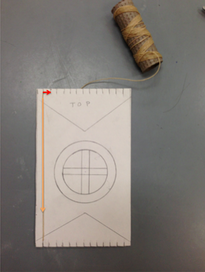
Now bring the thread down the front of the loom to the bottom, through the left-most slot.
Then, bring the thread up the back side of the loom, and go through the second slot |
|
Continue wrapping it around the front and back without missing any slits.
|
|
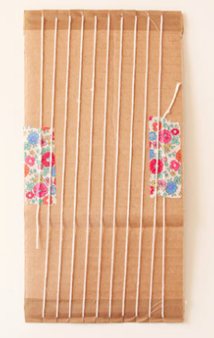
When all the slits are filled, leave a 3" tail on the back and tape down. Both tails should be on one side.
|
|
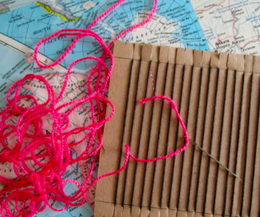
Thread your first color through the weaving needle. You don't need to knot the thread, but you may if you wish. Be careful not to make your yarn too short (you will be changing thread a lot) or too long (it will get tangled). About 2 1//2 ' works well.
|
|
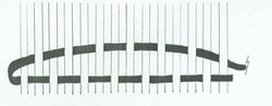
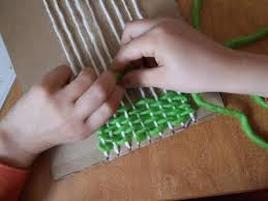
Bring your threaded yarn under the first warp on the right then continue across the warp thread going over then under.
|
|
When you get to the end of the row, turn the corner and go back across the warp thread. This time you will go under then over (the opposite way of the first row). This means every time you move across your board to the right, your pattern will be over then under. Every time you go to the left, your pattern will be under over.
|
|
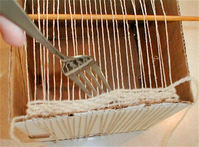
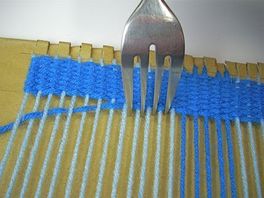
Continually beat down threads to tighten the weaving. You can use your fingers or an old fork.
|
|
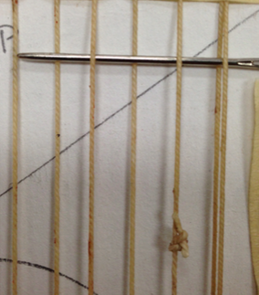
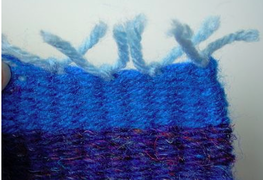
If you can see your warp threads (like the white threads in the photo to the left), you have not beat down your weft threads enough.
|
|
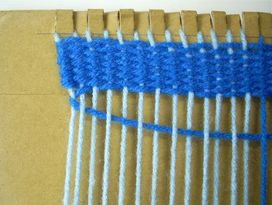
Weave using a "hill" to help prevent the selvage edge from dipping in as you move toward the center. The center warp threads are looser because they are not in direct contact with the slitted edge of the cardboard.
|

|
If you pull too tight when you go around the edge of the selvage, your sides will dip in and you will not be able of fold and sew your pouch together when you are finished.
|
|
Sides should be straight like this example.
|
CHANGING THREAD OR COLOR
To Change colors or add a new piece of yarn . . .
FINISHING STEPS
To Change colors or add a new piece of yarn . . .
- Only change in the center of the weaving (never at the edge)
- Stop and cut any extra yarn leaving about a 1" tail
- Start your new color by moving back 3 or 4 warp threads.
- Follow the same over and under (or under and over) pattern as your old thread
- Continue weaving as if you were using the same piece of yarn.
- Leave the tail hanging out on the front of the weaving to be cut off at the end
FINISHING STEPS
|
Once the weaving is finished, flip the board over and cut the warp threads across the center of the board. Starting on one end. Pull the first 2 threads out of the slit on the end of the board. Double knot them tightly at the top of the weaving. Continue across the board. The last knot will be tied using 3 strings. Continue on the other end. Cut the threads on the end that will become the top of your pouch close to the knot. You may cut the threads on the other end as well. This will become the bottom of the flap. Yarn may also be left as fringe, strung with beads, etc.
|
|
To cover the knots, use the same color as your last weft row. Tie one end and thread your needle on the opposite end. Push the needle through the side that has all of your tails from thread changes. Wrap the yarn across the top and push it back through on the other side. This is called a whip stitch.
|
|
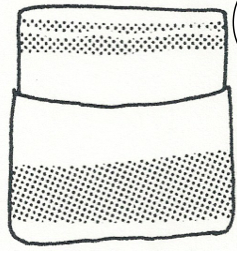
Cut any tails left by changing yarn. The side that has tails will become the inside of the pouch. Fold the bottom up leaving a small section that can be folded over as a flap.
|
|
Using the same whip stitch technique sew the sides up until you reach the top of the pouch edge. Starting at the bottom on one side, thread the needle from the inside through one side. Then cross over both edges and push the needle into the other side going through both edges. Continue to the top. Knot the end of the yarn on the inside edge so that it is hidden inside the pouch. Make sure you sew through the first or second row.
|
|
Read and follow the directions from one of the strap/friendship bracelet websites found under the research section. Make the strap and attach it to the pouch (the know can be pushed through the weaving or it can be sewn on with traditional needle and thread).
All kinds of things can be added to decorate your pouch including beads and buttons. Things can even be woven into the actual weaving. |
There are many other types of weaving. You can look them up on line if you would like to try something different.
A second technique is to weave all the sides together at once. This is accomplished by continuing the weaving around the back side of the loom. You would go around the board until you reach the height of the pouch. The flap is the woven up one side. See the websites below for further directions.
http://taliesin.confabulation.com/~workstead/cardboardweave.html
http://handsheadnheart.blogspot.com/2011/05/finishing-woven-pouch.html
Refinement
Cut any tails, stitch over any messy edges, etc. |
|
