Rubber Block Print - Project 2
Inspiration: Illustrate a Scene/Event from a Fairytale or Children's Story
You can not copy another artist's work, but you can create your own design in a similar style. DON'T COPY ANY DISNEY CHARACTERS OR WORK FROM OTHER ARTISTS.
If you choose to include a person in your design, please spend some time practicing your final drawing. Note how other artist simplify people when designing a character. Since we are creating a print, you will not be able to use a complex drawing. You may choose not to include people at all in your design. For example, if you are illustrating a story with a princess, you could draw her crown or the castle where she lives.
Include lots of patterns, textures, and line work in your composition, both in the main subject and background.. About 75% of the block should be carved out in some way. Carving too little or too much will create a poor final product.
Brainstorming Ideas
- Do a Google search for story ideas (fairytales, myths, legends, children's authors, etc.)
- Select a story
- Make a list of 5 scenes from the story that translate well into an illustration. Consider the background as well as the main focal point. The blocks are not large measuring 4"x 6". Keep that in mind as you begin to think of ideas.
Research Links
Fairytale/Children's Stories Websites
Children's Stories
Storynory
Grimm's Fairytale
Russian Fairytale
Hans Christian Anderson
Famous Children's Stories Illustrators
Edmund Dulac
Rohan Eason
Hannah Davies
Sveta Dorosheva
Kay Neilsen
Arthur Rackham
Fairytale/Children's Stories Websites
Children's Stories
Storynory
Grimm's Fairytale
Russian Fairytale
Hans Christian Anderson
Famous Children's Stories Illustrators
Edmund Dulac
Rohan Eason
Hannah Davies
Sveta Dorosheva
Kay Neilsen
Arthur Rackham
Visual Development
TIP: A common mistake in printmaking is not carving out enough of the printing block (See photo 1 for an example of a block that has not been carved enough). One way to create a successful print is to start with a simple outline and add marks inside to balance darks and lights (See photo 2 and 3 below).
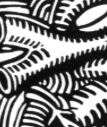
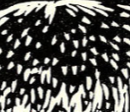
PHOTO 1-Too Little Carving/Texture PHOTO 2-Simple Shapes filled with Line PHOTO 3-Outline of simple shapes
- Pick a scene
- Draw 2 or 3 planning sketches.. You may want to trace the printing block so that you can draw the design to scale.
- Do not use words for this project.
TIP: A common mistake in printmaking is not carving out enough of the printing block (See photo 1 for an example of a block that has not been carved enough). One way to create a successful print is to start with a simple outline and add marks inside to balance darks and lights (See photo 2 and 3 below).
PHOTO 1-Too Little Carving/Texture PHOTO 2-Simple Shapes filled with Line PHOTO 3-Outline of simple shapes
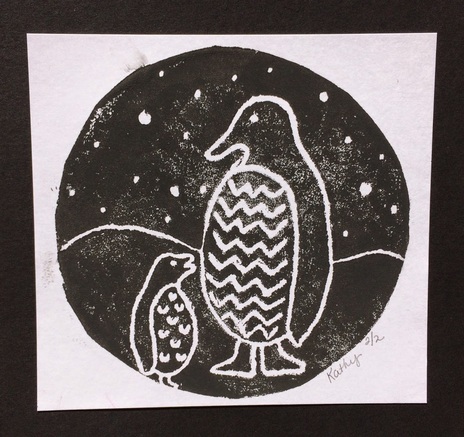
THIS IS AN EXAMPLE OF TOO LITTLE CARVING.
http://kathy-angelnik.blogspot.com/2015/01/patterned-penguin-printmaking.html
|
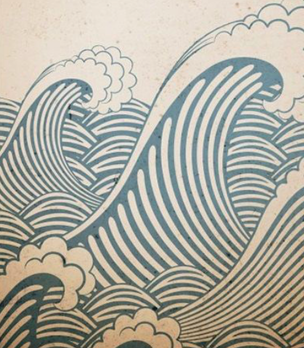
EXAMPLE OF FILLING SPACE WITH LINE WORK
http://thelittlefrenchbullblog.tumblr.
com/post/46913734173
|
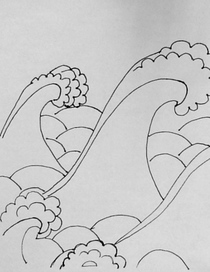
OUTLINE OF BASIC SHAPE BEFORE IT IS FILLED WITH LINE
|
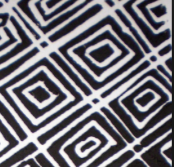
Line and Texture Examples


Rough Draft
Final Design
Carving the Printing Block
1. Transfer your design to the printing block.
2. Begin by carving away the material you don't want to print.
3. Start with a partial cut and create a practice print before completing all of your final cuts.
4. Finalize your design and complete all of your cuts. Be sure and check to see that you have achieved a balance between carved and non-carved areas. If any area stands out as too large and plain, decide how you can add some texture to break up the space.
5. Print a final draft of your completed design to check for any other needed changes. Once this is complete, you are ready to move on to your final prints.
6. Create multiple prints using different colors of ink and paper. One print will be photographed and turned in to Canvas to be graded.
Printing Options
Here are several ways you can finish your print.
Colored Ink
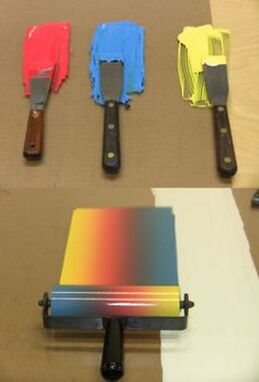
1. Color Options: red, green, yellow, blue, white, aqua, pink, and black. Colors can be mixed to create new colors. For example, white and red will make pink. You can create a mixed color or you can drop colors side by side to fade one color to another (see photo below)
- Draw your composition on the news print provided using a dark or ebony pencil. (Balance Positive & Negative Space, Avoid large areas of emptiness, use texture/line/pattern for variety, etc.)
- Lay your drawing face down on the print block and rub the back with the tools provided
- Lift your paper to see the transferred lines from the dark pencil on the block
Final Design
Carving the Printing Block
1. Transfer your design to the printing block.
2. Begin by carving away the material you don't want to print.
- There are several different sizes of carving tools. Choose the size that matches how much you want to remove. For example, use a small tip for fine detail or small areas.
- Remember to leave texture by not fully carving out some areas.
- Although some shallow cuts may show up when you print, plan to leave pieces of the surface as needed for texture. You only need to carve down about 1/8".
3. Start with a partial cut and create a practice print before completing all of your final cuts.
- This will allow you to see what needs to be removed more clearly.
- You can always carve more sections as needed.
- ONCE THE MATERIAL IS REMOVED YOU CAN NOT REPLACE IT. Be careful about removing too much of the block surface.
- Allow prints to dry. The first prints can be drawn on with sharpie to add textures, lines, and patterns. This will help you visualize your finished composition and plan your next cuts.
4. Finalize your design and complete all of your cuts. Be sure and check to see that you have achieved a balance between carved and non-carved areas. If any area stands out as too large and plain, decide how you can add some texture to break up the space.
5. Print a final draft of your completed design to check for any other needed changes. Once this is complete, you are ready to move on to your final prints.
6. Create multiple prints using different colors of ink and paper. One print will be photographed and turned in to Canvas to be graded.
Printing Options
Here are several ways you can finish your print.
Colored Ink
1. Color Options: red, green, yellow, blue, white, aqua, pink, and black. Colors can be mixed to create new colors. For example, white and red will make pink. You can create a mixed color or you can drop colors side by side to fade one color to another (see photo below)
 http://archive.printeresting.org/classifieds/ http://archive.printeresting.org/classifieds/
This color fade is created by dropping a small amount of different colored inks near each other and rolling the brayer over top. Rock the brayer back and forth slightly as you roll to create a blend where each color meets. Roll the blended colors on to your printing block.
|
|
|
Paper Choices
1. Colored construction paper may be used to add an additional color to your print. PLEASE USE THE SCRAP PAPER ON THE BOTTOM SHELF OF THE TURN IN RACK. If the color is not available, please see me and I will cut you a piece. Never take a full sheet of construction paper from storage. Our final print is small. By using scrap pieces, we can conserve the larger sheets for projects that require a full sheet. 2. Old book pages or newspaper can be used to create a unique look. See me for old book pages. Newspaper can be found under the 2nd sink. 3. A painted background can be created using acrylic or water color paint. You may place colors in the approximate area they would be needed for your design. For example, you could paint a yellow blob in an area where a flower will be printed. Colors don't need to align perfectly. 4. Pre-printed paper will add complexity to your design. See me for options or bring something you have at home. Options include scrapbook paper, old wrapping paper, or wall paper. 5. Roll out an ink fade on paper and allow it to dry before printing. This will add color to your background so that the ink texture matches the print texture. |
Advanced Techniques
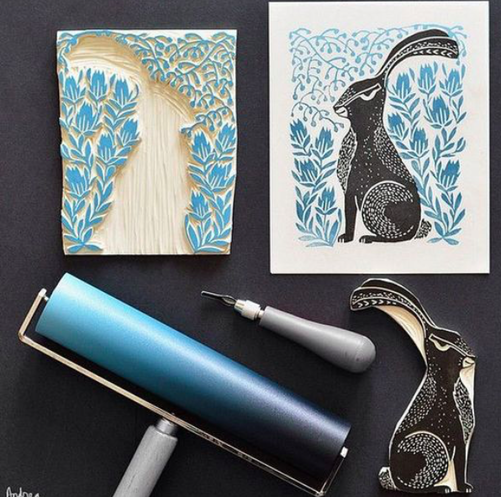
1. Hand painted areas can be created to enhance your final design. Painted areas should be limited since you will need to paint within the printed area. An example can be seen in the slide show above where the printed cat has a green painted iris.
1. Hand painted areas can be created to enhance your final design. Painted areas should be limited since you will need to paint within the printed area. An example can be seen in the slide show above where the printed cat has a green painted iris.
|
2. Two Color Printing is created by cutting out a shape with in your block producing a second stamp that can be rolled with a different color and placed in the cut-out void on your print..
|
https://www.pinterest.com/pin/125960120805347330/
|
