Pennsylvania Dutch Hex Signs
When you have completed your art piece, take a photo of your finished art and turn it in to Canvas
|
TAYLOR SEVER: JCHS 2017
|
Pennsylvania Dutch Hex Signs
Begin by watching the 3 Hex Signs videos above.. Read the information below and tell two people something new you learn.
History of Hex Signs
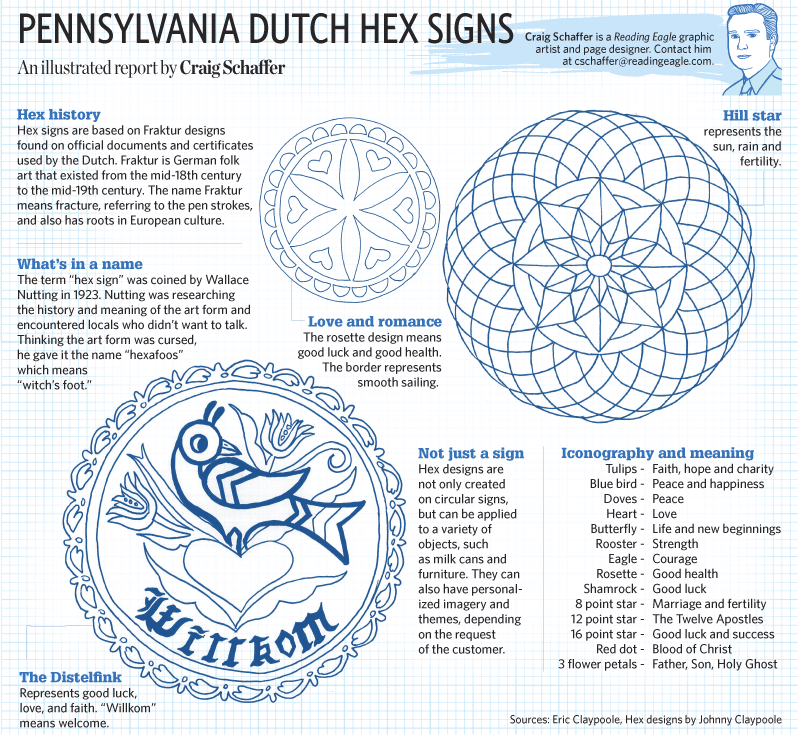
About 300 years ago, groups of peasant farmers from the Rhine region of Germany migrated to southeastern Pennsylvania. These settlers came to take advantage of religious freedom being offered by William Penn. They included settlers of plain dress -Amish and Mennonites – and others of more “worldly” or “fancy” dress – Lutherans and other Reformed groups. Over time, these settlers became known as “Pennsylvania Dutch”.
Like other immigrants, they brought their old world language, dress, traditions and art to their new home. Mystical bird and floral designs graced their birth and marriage certificates, family Bibles, quilts, and some furniture. The “fancy” farmers also decorated their large German style bank barns with colorful geometric patterns. Six-pointed star designs were very popular. The German word for six, “sechs”, sounded like hex to their English-speaking neighbors. In time these “hex” patterns became commonly called hex signs. This custom persists today.
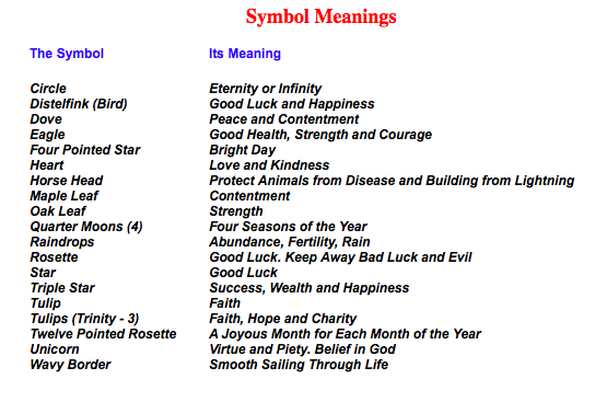
These bright, colorful designs had meanings or legends. Families selected a hex sign based on color, design and its meaning. Some of the more popular symbols included: hearts for love, birds (called distelfinks) for luck and happiness, tulips for faith, and stars for good luck. The colors used for painting were also carefully chosen because of their added meaning. Blue conveyed protection, white purity, green abundance and red strong emotion. The hex symbols were individually hand painted for many years. This approach, naturally very time consuming, limited hex sign use and enjoyment even in the Dutch Country.
In the early 1940’s, Jacob Zook, an 11th generation Pennsylvania Dutchman living in the village of Paradise, PA successfully pioneered the hand “silk screening” of hex signs. Here, a “silk screen” is used to apply each of the design’s bright colors to a carefully prepared signboard. Four or five colors are usually used; each color requires it’s own carefully designed screen. With air-drying between steps, a design usually takes about a week to complete. Silk screening, performed by skilled craftsmen, allowed hex signs to be made in quantity at modest cost. Interest in hex signs blossomed once they became readily available. Today, hex signs can be found throughout the world. In many homes, they have been enjoyed for almost three generations.
This History of Hex Signs information has been provided by the folks at Zook Family Crafts – “The Hex Place©” (formerly Will-Char) in Paradise, Pennsylvania.
http://lancasterpa.com/shopping/hex-signs/
Begin by watching the 3 Hex Signs videos above.. Read the information below and tell two people something new you learn.
History of Hex Signs
About 300 years ago, groups of peasant farmers from the Rhine region of Germany migrated to southeastern Pennsylvania. These settlers came to take advantage of religious freedom being offered by William Penn. They included settlers of plain dress -Amish and Mennonites – and others of more “worldly” or “fancy” dress – Lutherans and other Reformed groups. Over time, these settlers became known as “Pennsylvania Dutch”.
Like other immigrants, they brought their old world language, dress, traditions and art to their new home. Mystical bird and floral designs graced their birth and marriage certificates, family Bibles, quilts, and some furniture. The “fancy” farmers also decorated their large German style bank barns with colorful geometric patterns. Six-pointed star designs were very popular. The German word for six, “sechs”, sounded like hex to their English-speaking neighbors. In time these “hex” patterns became commonly called hex signs. This custom persists today.
These bright, colorful designs had meanings or legends. Families selected a hex sign based on color, design and its meaning. Some of the more popular symbols included: hearts for love, birds (called distelfinks) for luck and happiness, tulips for faith, and stars for good luck. The colors used for painting were also carefully chosen because of their added meaning. Blue conveyed protection, white purity, green abundance and red strong emotion. The hex symbols were individually hand painted for many years. This approach, naturally very time consuming, limited hex sign use and enjoyment even in the Dutch Country.
In the early 1940’s, Jacob Zook, an 11th generation Pennsylvania Dutchman living in the village of Paradise, PA successfully pioneered the hand “silk screening” of hex signs. Here, a “silk screen” is used to apply each of the design’s bright colors to a carefully prepared signboard. Four or five colors are usually used; each color requires it’s own carefully designed screen. With air-drying between steps, a design usually takes about a week to complete. Silk screening, performed by skilled craftsmen, allowed hex signs to be made in quantity at modest cost. Interest in hex signs blossomed once they became readily available. Today, hex signs can be found throughout the world. In many homes, they have been enjoyed for almost three generations.
This History of Hex Signs information has been provided by the folks at Zook Family Crafts – “The Hex Place©” (formerly Will-Char) in Paradise, Pennsylvania.
http://lancasterpa.com/shopping/hex-signs/
|
|
|
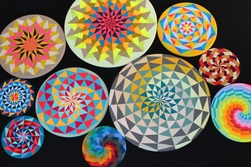
Artist Inspiration
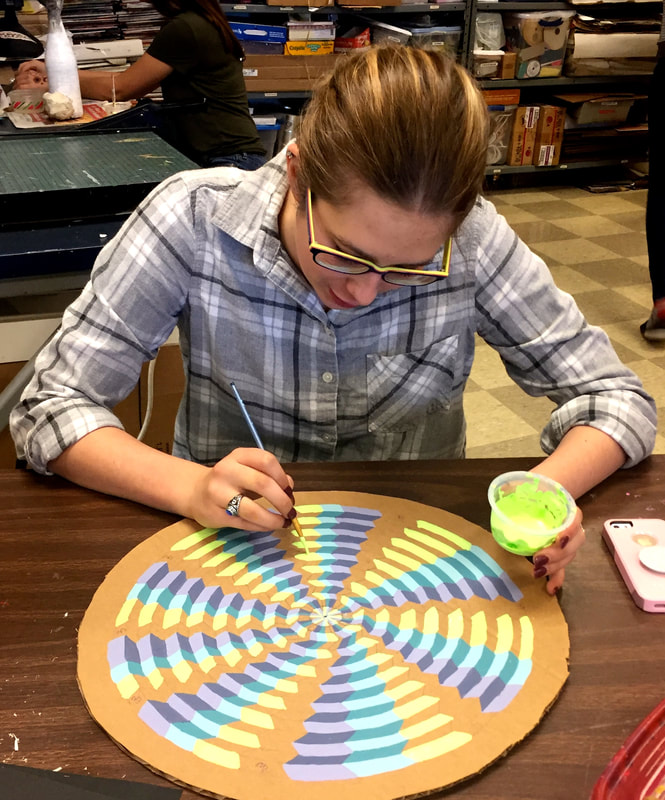
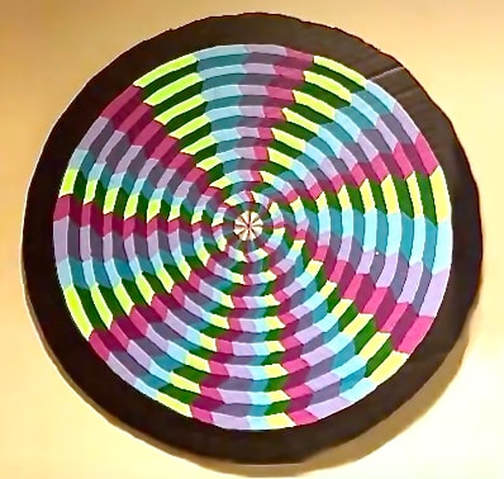
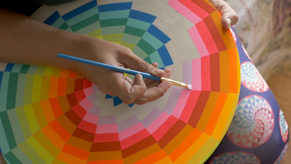
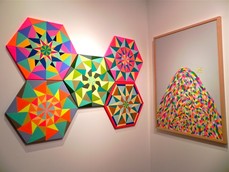
Neo-Folk Artist, Kristin Farr, creates modern day versions of Pennsylvania Dutch Hex signs. Notice that her work has strong geometric patterns. She often uses muted colors or neon colors rather than a traditional primary palette. She calls her designs Magic Hecksagons.
Neo-Folk Artist, Kristin Farr, creates modern day versions of Pennsylvania Dutch Hex signs. Notice that her work has strong geometric patterns. She often uses muted colors or neon colors rather than a traditional primary palette. She calls her designs Magic Hecksagons.
|
|
|
Generating Ideas
Brainstorm ideas for your project including symbols, animals, colors, patterns, etc. Write down 10 ideas that may work for your project.
Researching
You may choose to create a design that is more traditional or one that is based on the work of Kristin Farr. If you choose to create a design in the style of Kristin Farr, watch Video 3 - Painting Magic Hecksagons with Kristin Farr found on Schoology to see how to draw out a design. If you choose to create a traditional style hex sign, study some examples found on line. Choose symbols and colors based on their meanings.
Look at some examples of hex signs online. Below are some links to help you get started. You can also do a Google Image search for ideas.
Hex Signs
http://www.padutchculture.com/hexsigns.html
Visual Development
Test Pattern - Start by creating a test pattern. Below is a close up image from a Kristin Farr Painting and one from a traditional hex sign. Choose the pattern that matches the style you are going to use for your hex design. On the square provided, lightly draw that pattern and paint it trying to match the colors.. You are trying to repeat the image as close as possible. There are fluorescent colors available if needed. Once you have completed the sample,
Take a photo and send it to Canvas
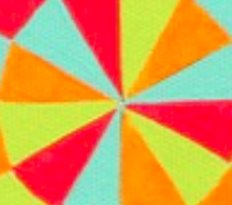
Kristin Farr Test Pattern
|

Traditional Test Pattern
|
Do 3 or 4 sketches laying out ideas for your final design. Once you have your ideas finalized, you can start your final design. At this point you should also pick out the colors you want to use on your design. Traditional hex signs use a limited number of colors, usually four or five. If you are designing a traditional hex sign, you should also limit your colors. Kristin Farr uses similar intensities and non-traditional colors, but doesn't limit the amount of colors. If your design reflects her style, you may add white, black or complements to change the tone of your colors, She sometimes adds a neutral, like beige to ground the other colors. Refer back to the color information on the Choice 1 page for color mixing ideas and color schemes.
Final Design
Refinement
Go back over your work and look for areas that need improvement. This would includes things like erasing pencil lines, fixing painting mistakes, cleaning up messy paint strokes or uneven edges, etc. Ask a friend if you need to add or fix any areas.
- Create a cardboard circle by tracing around the large template and using a X-acto knife. This will represent the wood the original signs were painted on.
- Paint the circle with white house paint and allow to dry. If your circle warps, paint the back of the circle with a brush that has been dampened with water. Don't apply the water to heavily or it will ruin the cardboard.
- Trace a circle using the template on a piece of newsprint to work out your design. This will allow you to draw your design without messing up on your final circle. Feel free to make corrections and erase to perfect your design. Other tools like rulers and compasses can also be used.
- Label your colors on the newsprint design to use as a guideline when you paint the final piece.
- Use a piece of graphite to color the back of your newsprint design.
- Lay the newsprint design face-up on top of the white surface of the cardboard surface.
- Retrace your design so that the graphite transfers the design to the cardboard. To avoid confusion, use a colored pencil or marker to see where you have already retraced. Also use a ruler to help keep straight lines straight.
- Once your design is drawn, you can begin painting. If you are using Kristin Farr as your inspiration, you may use fluorescent paints. Traditional designs will use the regular acrylic paint colors.
Refinement
Go back over your work and look for areas that need improvement. This would includes things like erasing pencil lines, fixing painting mistakes, cleaning up messy paint strokes or uneven edges, etc. Ask a friend if you need to add or fix any areas.
