Woodburning
Artist - Becky Lewis (Former JCHS Student)
|
Wood Burning - JCHS Student
|
LISA ROBERTS, JCHS Student 2018-19
|
When you have completed your art piece, take a photo of your finished and turn it in to Canvas
History of Pyrography
Pyrography is the art of decorating wood or other materials with burn marks resulting from the controlled application of a heated object such as a poker. It is also known as “pokerwork” or “wood burning”.
Pyrography means "writing with fire" and is the traditional art of using a heated tip or wire to burn or scorch designs onto natural materials such as wood or leather. Burning can be done by means of a modern solid-point tool similar to a soldering iron. Various tip shapes can be used for "branding" the wood or leather. Another tool, the “Hot Wire Tool” allows the artist to shape the wire into a variety of configurations, to achieve broad marks or fine lines. Two more basic methods include using a metal implement heated in a fire, or even sunlight concentrated with a magnifying lens.
A great range of natural tones and shades can be achieved - beautiful subtle effects can create a picture in sepia tones, or strong dark strokes can make a bold, dramatic design. Varying the type of tip used, the temperature, or the way the iron is applied to the material all create different effects.
Pyrography is time-consuming, done entirely by hand, with each line of a complex design drawn individually. After the design is burned in, wooden objects are often colored, sometimes boldly or more delicately tinted.
Pyrography has been practiced by a number of cultures including the Egyptians and some African tribes since the dawn of recorded time. Hundreds of years ago pyrography as we know it was vastly different from the simple art form that it is now. The basic method was to get a metal poker and nestle it into the hot coals of a roaring fire. The poker would heat up to a glowing red. When the correct temperature had been reached the artist would then take the poker carefully out of the fire and apply it to the timber (wood) of their choice. . . Pyrography is also a traditional folk art in many European countries, including Romania, Hungary, as well as countries such as Argentina in South America.
www.rocklin.k12.ca.us/.../Pyrography/What is Pyrography.doc
1. Generating Ideas
Begin by brainstorming ideas about your subject matter. Anything you might draw with a pencil will do well with pyrography. Subjects include animals, landscapes, designs, portraits, etc. Also look at styles and textures. Make a list of ideas that you may want to try (5 to 7 Ideas).
2. Researching
Examples
http://www.victoria-george.co.uk/Pages/default.aspx
https://www.etsy.com/listing/73390598/ancient-tree-art-block-woodburning
https://www.etsy.com/listing/63307455/stars-swirls-pyrography-birdhouse?utm_source=OpenGraph&utm_medium=PageTools&utm_campaign=Share
http://www.suewalters.com/PyroGallery.html
http://www.lsirish.com/2014/06/08/fading-wood-burnings/
http://4rtgallery.blogspot.com/2013/05/pyrography-by-julie-bender.html
Watch all Video Demonstrations
Burning on Leather
http://blogdelanine.blogspot.com/2013/01/shop-is-open.html
Popsicle Stick Bracelets
http://alisaburke.blogspot.com/search/label/wood%20burning
http://happinessiscreating.com/wood-burned-popsicle-stick-bracelets/
3. Visual Development
Choose 3 ideas and draw small thumbnail sketches. Consider the shape of your piece of wood and how the image will fit on that shape. Use a pencil to draw different values and textures. You will need areas that are light, middle and dark in value (highlights, mid tones, and shadows). Not everything will be solidly shaded. Consider different textures. The closer the lines or shapes in the texture, the darker the value.
Different textures and values
|
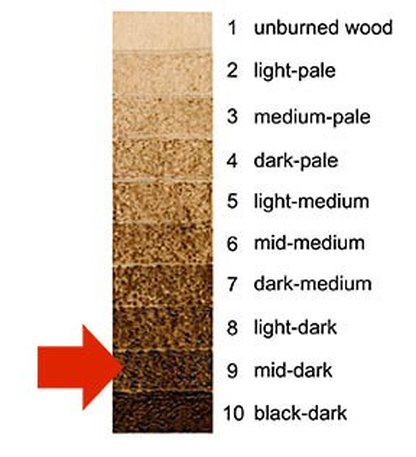
Value Scale - Wood color through black.
|
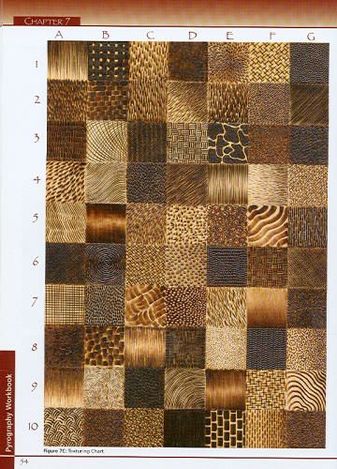
Test Sampler - (Value Scale/Texture)
You will need to create a practice burn on a scrap piece of wood. Above is a texture chart and a value scale that contains 10 different values (including no burn and total black. Your sampler should include 2 parts. First, choose 5 different patterns from the texture chart and burn them on your practice wood scrap. Next, try to burn 5 steps in the value scale from very light to solid black. Your practice steps need to be about 1" block for each section. Take a photo and upload it to Schoology.
You will need to create a practice burn on a scrap piece of wood. Above is a texture chart and a value scale that contains 10 different values (including no burn and total black. Your sampler should include 2 parts. First, choose 5 different patterns from the texture chart and burn them on your practice wood scrap. Next, try to burn 5 steps in the value scale from very light to solid black. Your practice steps need to be about 1" block for each section. Take a photo and upload it to Schoology.
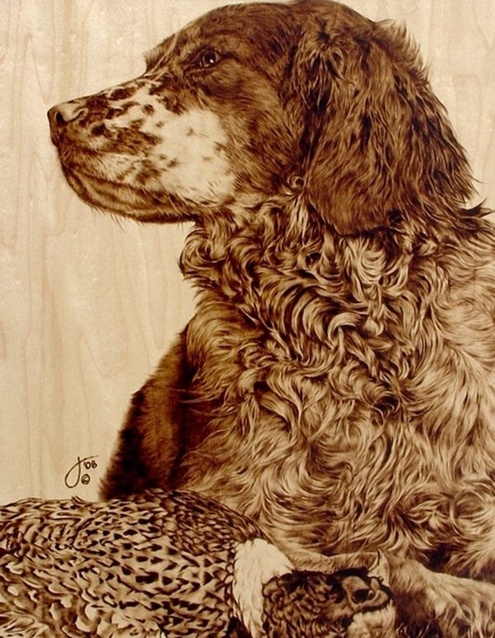
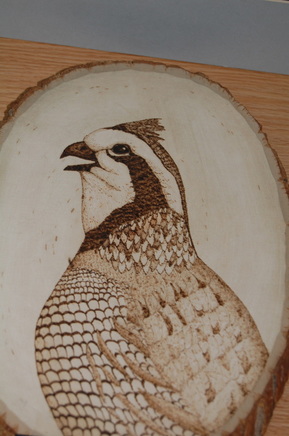
Notice the difference between the fur and feathers created by using different textures.
4. Final Design
PPT Directions (YOU MUST READ THIS BEFORE BEGINNING)
http://goo.gl/7hY6cv
- You will need a minimum of 5 different values.
- The design should be of medium complexity
- Vary sizes of design or images (small, medium and large)
- Be careful not to have to similar values/textures side by side
- You may need to sand before beginning
- Small touches of color may be added with watered down acrylic paint.
- The entire box should be filled with designs and burn work (except for the bottom)
Additional Options
- Leather Tags
- Popsicle Stick Bracelets
- Wooden Object from Home
5. Refinement
Sand or darken areas that need more contrast. Add details to areas that are too plain. Ask a friend if they see any area that needs work. Look at it from across the room or turn it upside down to see if there are any major trouble spots.
