Value Painting
Essential Question: To what extent can strong composition contribute to the success of a work of art?
I Can . . .
Understand the Element of Value and how it relates to tone and color
Study techniques used to create strong compositions
I Will . . .
Create an abstract design using letters and rectangles
Paint a Monochromatic Value Painting
When you have completed this project, click the button below to download the Rubric, then turn the rubric in to Schoology along with a photo of the finished artwork.
Project Overview
Composition
Composition is all about where we put things in our artwork. It is how we organize the elements of art using the principles of design. Only a small part of the information about composition is written here. There are many things that go into composing a good design. Below are a few things to consider and some definitions that will help you understand the compositional concepts.
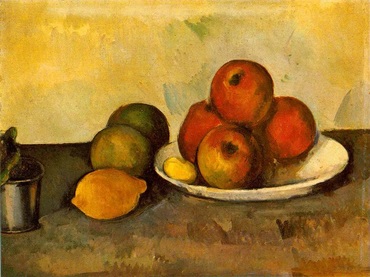
OVERLAPPING TO CREATE DEPTH
http://sjaart-mediaarts.weebly.com/11---historical-still-life.html
|
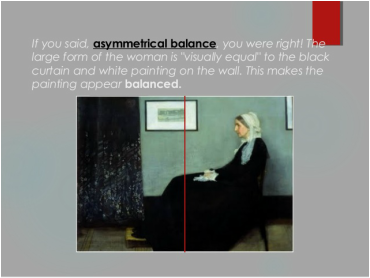
BALANCE
http://www.slideshare.net/bruceblack/the-principles-of-design-for-art
|
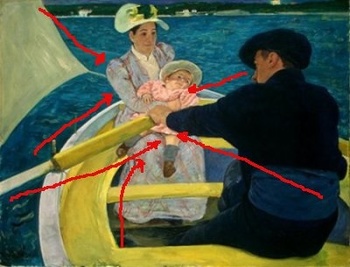
LEADING LINES (Red lines were added to demonstrate leading lines)
http://watercoloristsofwhatcom.com/LeadingToAOI.html
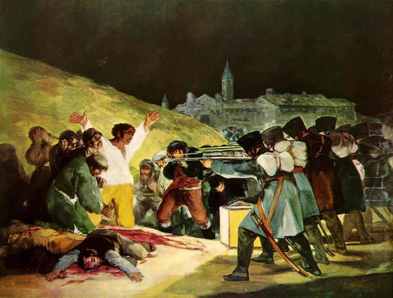
FOCAL POINT (White Shirt)
http://www.artmuseums.com/goya.htm
|
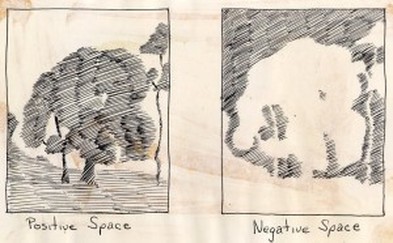
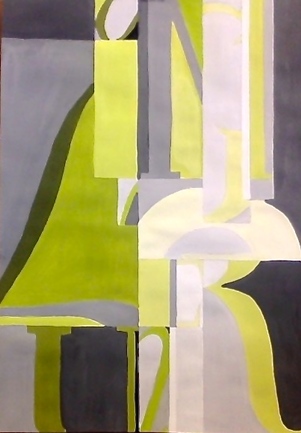
NEGATIVE SPACE
http://curkovicartunits.pbworks.com/w/page/83610883/UWCSEA%20Gr8%20Art%20-%20Unit%201
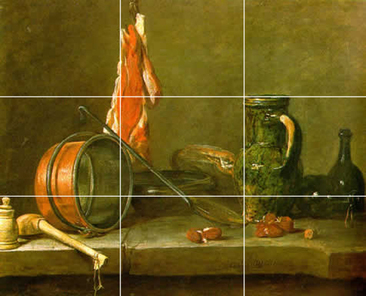
RULE OF 3RDS
http://willkempartschool.com/the-secret-of-good-composition/
|
Vocabulary
Please write the following Composition terms and definitions in your sketchbook
Composition - The arrangement of the individual elements within a work of art so as to form a unified whole
http://www.moma.org/learn/moma_learning/glossary#c
Overlapping - Placing elements or images over top of one another to create the illusion of depth (foreground, middle ground, background)
Balance - Arranging elements in a work of art so that both sides have an equal visual weight (asymmetrical, symmetrical, and radial)
Negative Space - the empty areas in a compostion that surround objects or positive space
Leading Lines - lines in the composition that lead the viewer toward the focal point or around the composition.
Focal point - the area within a composition at which the emphasis is greatest and where the eye of the viewer continually comes to rest (the center of interest). https://www.ket.org/artstoolkit/visual/glossary.htm
Rule of Thirds - The rule of thirds (an application of the Golden ratio) is a guideline commonly followed by visual artists. The objective is to keep the subject(s) and areas of interest (such as the horizon) out of the center of the image, by placing them near one of the lines that would divide the image into three equal columns and rows, ideally near the intersection of those lines. https://en.wikibooks.org/wiki/Introduction_to_Art/The_Basics_of_Two-Dimensional_Art

Video found on http://thevirtualinstructor.com/how-to-create-focal-points.html
Bellow are 5 ways to create a focal point in an artwork. http://thevirtualinstructor.com/how-to-create-focal-points.html
Watch the Video Composition Fundamentals in 2 D by clicking on the link below
- Contrast - One way to create a focal point in art is through the use of contrast. Contrast refers to difference. Any type of difference in imagery will result in that element becoming a focal point. Difference or contrast can come in many different forms. Color, value, texture, shape, and form can all create contrast. By combining elements, you can increase the contrast that is created, thus strengthening the focal point.
- Isolation - Another way to create a focal point in artwork is through isolation. Whenever one object or element is separated from a group it becomes isolated and in turn, becomes a focal point.
- Placement - Objects that are placed in the center of the picture plane or near center, will naturally become a focal point. Most of the time, a focal point that is not exactly center is preferred. By placing an object or element just off center, you can create a focal point through placement without affecting the aesthetics of the work.
- Convergence - A fourth way to create a focal point in artwork is to use implied lines to direct a viewer's eye to an object or element. This technique is known as convergence.
- The Unusual - Another way to create a focal point in artwork is to introduce an object or element that is unusual to the scene. This object will stand out and demand attention thus creating a focal point.
Watch the Video Composition Fundamentals in 2 D by clicking on the link below
Generating Ideas
Write a list of 5 words or 10 letters that could be used in your design in your sketchbook.
Research
Look for 3 to 5 different fonts that you may use as part of your design. Try to choose a variety of styles. Some ideas include script, thick, block, serif, san serif, modern, gothic, etc. Create a document to store your finds.
Online Font Foundries
1001 Free Fonts
Abstract Fonts
Type Zebra

Types I used in my design
Visual Development
Begin by watching Value Painting Video 1. Once you have watched the first video, complete the steps below.
Begin by watching Value Painting Video 1. Once you have watched the first video, complete the steps below.
Painted Value Scale
Your will paint 2 value scales in your sketchbook on one page. Each scale will have 9 boxes. The first value scale will be painted using black and white. The second value scale will be created using white, black and one color (red or blue). The concept of painting a value scale is the same as the value scale you created with a pencil. In the first box will be pure white and the last box will black (or the darkest color possible without being pure black). Each step should get progressively darker as it head towards step 9. Value scales should be neat, painted within the box and without brush strokes.. Take a photo of both scales and turn it into Schoology.
Your will paint 2 value scales in your sketchbook on one page. Each scale will have 9 boxes. The first value scale will be painted using black and white. The second value scale will be created using white, black and one color (red or blue). The concept of painting a value scale is the same as the value scale you created with a pencil. In the first box will be pure white and the last box will black (or the darkest color possible without being pure black). Each step should get progressively darker as it head towards step 9. Value scales should be neat, painted within the box and without brush strokes.. Take a photo of both scales and turn it into Schoology.
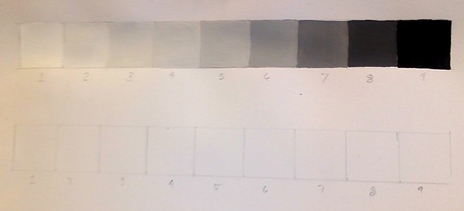
White and Black Value Scale
|
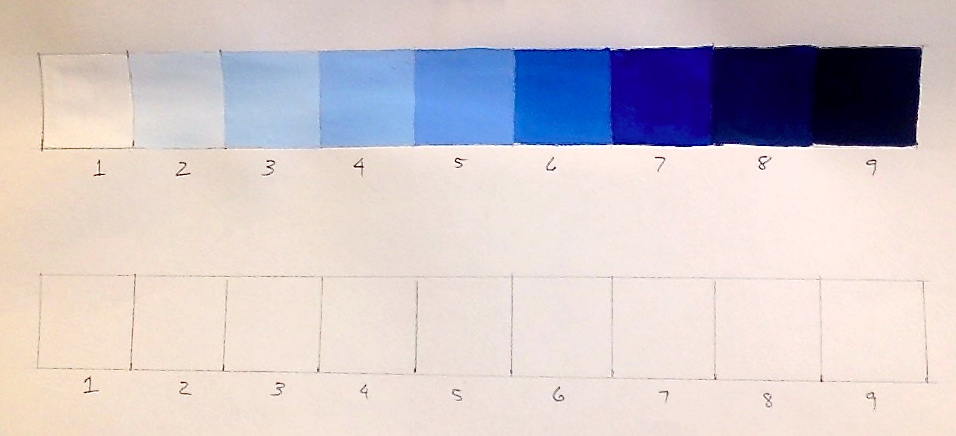
White, Black and Blue Value Scale
|
Final Design
Detailed Directions
View the detailed directions PPT below.. This will give you information not available on my Weebly. You must read and follow these directions in order to be successful with this project.
Detailed Directions
View the detailed directions PPT below.. This will give you information not available on my Weebly. You must read and follow these directions in order to be successful with this project.
Watch Value Painting Video 2.
Rule of 3rd
As you design your final composition, remember to use the Rule of 3rd. You will be creating a focal point vertical on one of the 3rd dividing line.
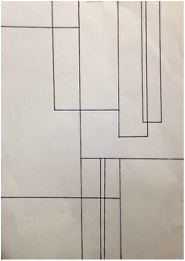
Divide your Space
Use vertical boxes to divide your picture plane. Remember, you will be painting sections so you want to avoid spaces that are too small to paint.
Add Letters
Next you will begin to add letters to your design. Use no more than one per box, vary sizes/fonts, and don't try to fit the entire letter into each square. Not every box needs to be filled with a letter.
Next you will begin to add letters to your design. Use no more than one per box, vary sizes/fonts, and don't try to fit the entire letter into each square. Not every box needs to be filled with a letter.
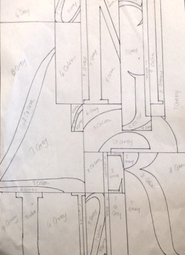
Label Values/Color Section (See the image above)
Put the number of the value in each section. For example, if you wanted a light grey you would label the section 3 grey or 3 blue (or the name of the color you are using) Remember to create a focal point along one of the divisions of 3 by using mostly light values. As the values move away from the focal point the should get darker with the very darkest values being along the edge of the sides.
Turn in this labeled rough draft to schoology.
Transfer Your Final Design
Use a light box to transfer your final design to the final paper. DRAW LIGHTLY. Lines will show through the paint.
Watch Value Painting Video 3
Paint Your Design
Start by mixing enough of your main color to complete the entire project. I have some containers available to store the color. You may share a color with someone at your table. Colors allowed for this project are red, blue, yellow, green, orange, or purple.
Refinement
Look for areas that are uneven or have streaks. These can often be corrected by using a damp paint brush. If you use too much water, you will remove the paint and have to repaint the entire section. Ask 3 people for a positive about your work and one are that needs to be worked on more.
Paint Your Design
Start by mixing enough of your main color to complete the entire project. I have some containers available to store the color. You may share a color with someone at your table. Colors allowed for this project are red, blue, yellow, green, orange, or purple.
- Make sure your painted edges are clean and smooth.
- Throughly mix colors before applying so there is no streaking.
- Mix enough color to complete the entire area.
- If you paint over an area that has been previously painted, remember that rewetting a color can cause it to mix with the new color.
- Fill in all boxes completely.
Refinement
Look for areas that are uneven or have streaks. These can often be corrected by using a damp paint brush. If you use too much water, you will remove the paint and have to repaint the entire section. Ask 3 people for a positive about your work and one are that needs to be worked on more.
